An important aspect of sharpening is to lesson damage to a tool’s edge to start with…
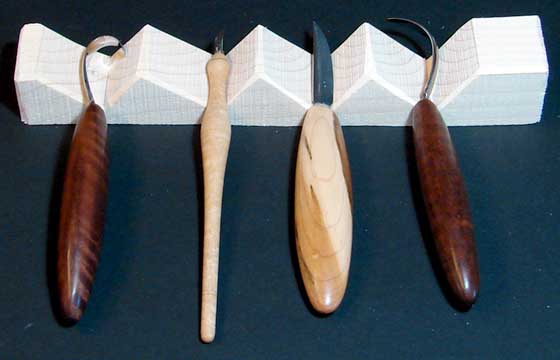
As a knife maker who respects his customers and his craft, I go to rather extreme efforts to make certain every bit of every edge I produce is flawlessly sharp. Below are two photos, one shows respect by the carver for their tools, the other disregard. The block is nothing more than a chunk of sawn 2×2, it took 2 minutes to make.
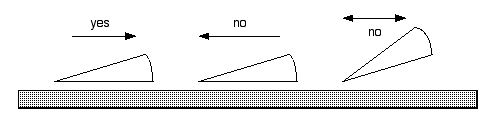
Why is the situation in the second photo so hard on tools?
When two keen edges of hard steel are allowed to touch, even slightly, many many tons of presssure per square inch are exerted – this is because the point where they meet is so very microscopic.

STROPPING:
Remember- stropping IS sharpening. This is a common misunderstanding. The polishing compounds used on strops are micro fine abrasives – they cut metal. A standard leather strop with good compound and good technique is all that is needed to keep most tools sharp for a long time. There are a myriad of compounds on the market. Products like jewelers rouge and tripoli are soft and slow cutting – some carvers use them. I would rather see carvers use materials that are meant for polishing hard steel. This requires a fast cutting, yet super fine, polishing compound. Examples – green chromium oxide, white or grey aluminum oxide stainless-steel polish (Zam, Fabuluster, Dico etc. – available from hardware stores, lapidary and carvers’ catalogs). These materials give a mirror polish with little effort. However, because they cut so efficiently, careless stropping can easliy round and ruin a tool’s edge. The secret is careful stropping with good materials.
When stropping flat-ground tools like the Harley knife, lay the tool flat on the leather strop, polishing the whole surface with solid pressure. The tool’s edge will compress slightly into the softness of the leather – this will sharpen the microscopic bevel at the edge. Using a few strokes, pressing firmly as you strop either side, should be enough to bring a slightly dull tool back to razor sharpness. Years ago I started using wood as a strop; for this a medium hard and even grained wood like basswood works well. It is especially good for hollow ground tools, or any tool not having a micro bevel. When stropping or honing knives – start the stroke with the pressure at the bottom of the blade and slightly raise the handle as the stroke reaches the tip.
Note: My friend Bill Jaeger teaches flat plane carving to about 60 people at the Swedish Institute, he has observed that the principle reason people round over the edge of Harley knives when stropping is not because they start with the back of the tool rasied – but rather because unconsciouisly they give a twist, a flip up of the handle, like a flourish right at the end of the stroke. Nothing could be worse! He said it has beeen very difficult to get students to be aware of this problem. All I can say to prevent this is ” Watch carefully what you do – or have someone else watch”
Is your brand of stropping compound working well?
Try this: After applying a fresh coat of compound, the very first stroke of the tool should leave slight black streaks on the strop, and mirror polish on the tool. If it leaves only a slight dull grey color on the strop, the compound is too soft (not removing enough metal). If the tool is left dull or scratchy looking, it is too course a polish.
If stropping isn’t working well for you, here are possible reasons:
A). The tool needs honing (see next section).
B). Your compound is too slow cutting.
C). The strop is too hard to compress enough to sharpen the microscopic bevel or you are not able to press hard enough). In either case, raise the back of the tool very slightlyoff of the strop – this will put all of the pressure on the edge.
D). If stropping rounds over the edge too quickly, and you have followed the other directions, then likely the strop is of too rough or too soft a material – go to a harder or finer leather, or to smooth basswood as a strop. You should be able to press quite hard, while stropping, without rounding the edge. It’s better to take a few strong and careful strokes than a lot of light careless ones.
HONING:
The tools I produce are such that they rarely need honing! But when to hone? Hone when the microscopic bevel is getting too large or too blunt (stropping no longer easily brings the tool back to razor sharpness), or when there is a nick to remove. To hone, lift the tool only slightly off the back (not at all if it is a hollow ground tool). This will keep the edge thin. Stop honing either side when a very tiny burr is raised on the entire edge. Feel this burr by stropping the tool lightly against a finger. Remove this burr with a super fine hone, or with your strop, but use the strop for the finished edge.
Which Hone?: Fine diamond, ceramic, fine india, arkansas, all work well. Do not use a coarse carborundum bench stone, unless the edge is damaged badly. I do not recommend using any power grinding equipment.
IS IT SHARP?
There is only one test that I know of that can actually tell that a tool is sharp (shaving hair means little – a tool that is full of nicks can still shave hair). I learned this test from a Japanese furniture maker. Take a piece of clear red or white cedar (pine or basswood will not work well for this), cut or split it to a piece about 1/4″ x 1”, like a thick paint stick, and take a long slicing 30 degree angled cut across the end grain. Look very closely at this surface. If it is very shiny, clear and dark, you have a perfect edge (all knives I make pass this test before I sell them). Even the tiniest microscopic ding or nick functions like a little bulldozer – lt will leave a tiny whitish streak of crushed fibers across the cut surface. lf the entire cut surface is dull, crumpled, or broken looking, than the entire edge is dull and acts even more like a buildozer. See if a few strokes of stropping will fix this, if not than start with a hone. On the other hand, if an edge is too thin and has no microsopic bevel, its fragility will also be shown by the cedar. The hard part of the cedars’ growth rings will microscopically damage an edge that is too thin.
To strengthen the cutting edge ever so slightly, keep stropping with good compound, slightly lifting the back off the edge off the strop only if necessary.
Here’s my Leather Strop Page
SHARPENING SPECIFICS
BASSWOOD CARVING KNIVES (Harley & Stubby Knives)
Because of the width of the blade and the high quality of the steel I am able to shape these blades especially thin (12 °), this results in knives that cut wood extremely easily. However, twelve degrees is too thin for the final cutting edge, so I add, microscopically, a little heavier bevel right at the edge. In sharpening, the goal is to keep this microsopic bevel as small as possible, and yet maintain the thinness of the blade. The thinness gives them great ease of cutting, however this means they should never be used to pry or lever wood. If you eventually need to hone one of these knives to re-establish the edges’ shape – be sure afterward you have added back a micro-bevel at the edge to strengthen it. A few strong strokes on the strop with the back lifted should do it.
Repairing a damaged tip on a Harley Knife:
“Del, I need to repair a tip on one of the Harley knife I purchased from you 6 years ago. It is a Mora knife. The very end of the tip is broken.”
“Hi Bob, I have found tips like that quite quick to repair – by placing the tip on a coarse stone, edge straight up, then, looking sideways at the knife – hold it at a 45 degree angle to the stone and run it up and down the stone straight in line with the blade, (not sideways to the blade). It should quickly work down the back of tip till it comes to a crisp point, refine it on a very fine stone, a quick stropping to get rid of any burr, and it’s brand new.”
“Del, I just got done following your instructions and the knife point appears to be back to a good point.
Thanks for directing me on how to do that, Bob”
HOOK KNIVES
I polish the entire inside of the blade, thus I recommend never honing it – that would only scratch the polish. Instead, to remove the burr created when the outside bevel is honed – take a 1/2″ dowel, rub a good sharpening compound on it, and laying it perpendicular to the steel, stroke away from the cutting edge on the inside. If you are carving a particularly hard or abrasive wood – a way to toughen the edge is to create a micro bevel on the inside. Hold the dowel at an angle to the edge, 30 degrees is good, and stroke once or twice going away from the edge. Don’t overdo it!
To strop the outside – stroke backwards on your strop – stropping the outside of the tool in a sweeping motion as you raise the handle, when the handle is vertical – simply rotate it a 180 degrees and strop down to the tip of the tool. After many sessions of carving/stropping, carving/ stropping, the edge may become slightly rounded (more from using leather than from using wood strops) – now is the time to hone.
Honing a hook knife: Rub the outside of the hook knife with a dark colored magic marker – this will each you exactly what you are doing with the hone (or strop). With the hooks tip resting on your bench, take a fine or extra fine (600 or 1200 grit) diamond hone and gently sweep it along the edge, trying to stay back from the actual edge a 1/16″ or so. the markers ink will help you do this. Keep stroking in this plane until the honing strip reaches the edge. Stop when you can feel a slight burr forming on the inside . Once you have learned to do this it will be easier to take the same process to the end curve of the knife.
After honing, always do the outside and inside stropping, and the tool should be like new. Test it in by cutting – the surface should be perfectly shiny without and lines. If you are in tougher wood and want to add a tiny micro bevel to toughen the edge, the dowel with compound is the thing to use.
SLOYD KNIVES
To strop: – take the compound, rub it on a piece of fine grained wood like basswood or on your leather strop, and stroke backwards – stropping the bevel of the tool in a sweeping motion. Put most of the pressure on the back of the bevel as you are learning, slowly adding more pressure to the edge as you learn. Use a magic marker as mentioned in hook knives to see just where the strop is hitting.
To Hone:
After many sessions of carving/stropping, the edge may become slightly rounded (slightly more from using leather than from using wood strops) – this is when it’s time to use a fine hone on the bevel to re-flatten the edge. I find for many people there is better control if the stone is on the bench and your whole body makes a sweeping motion with the tool, rather than taking the stone to the tool. This is true for stropping as well. Hone one side till you can feel a slight burr along the entire opposite edge , then hone the other side. If new at this use a magic marker, very good light, and close-up glasses.
After honing, always strop, till the tool cuts like new (leaves a shiny flawless surface)
KOLROSING KNIVES
These are made of M1 high speed steel so they rarely need even stropping. You may use a leather strop, but I prefer to just rub compound on a piece of basswood and use that for a strop. These tools are unusual: they need a fairly blunt angle because the cut must be shallow to allow the tool to make very tight turns. If you find the cut is still too deep, then use a fine hone to thicken the bevel a bit.
A New Sharpening Section, added Nov 2006
Understanding Micro-bevels A micro-bevel is just that, a very tiny bevel at the very edge of a knife, sometimes so tiny they are invisible to the naked eye, or up to a max of 1/32 ” wide, which can be seen. The principle reason is to provide toughness right at the edge, without sacrificing the geometry of the blade. They are used on chisels, power and hand planes, saw blades, and even certain carving knives.
They are essential in the Harley knife in particular (named after the woodcarver Harley Refsal) because it has an unusually thin included bevel angle (13 degrees). The reason for such a thin bevel is ease of cutting – this is allowed in this knife only because it is designed for just one task – straight flat cuts in soft basswood. For any other tasks (cutting hollows, hard basswood, knots etc.) one would need a more normal heavier beveled knife (16-25 degrees). By adding an ever-so-tiny micro-bevel to each side of a Harley knifes’ edge it loses very little efficiency, but toughens up the edge just enough to make such a thin knife very serviceable. ( There is an illusion about knives being thin – the Harley knife has a very thinincluded bevel angle – because this continues all the way to the back of the knife it looks thick at the back – this make it wonderfully strong without sacrificing cutting ease. There are knives made of much thinner stock – but which have much thicker actual bevels near the edge – so even though they look like they would cut easily they may not.
Honing:
Stropping is for keeping the edge on your knife. If you have inadvertently rounded the cutting edge of the knife too much while stropping or improper honing, no amount of further stropping will fix the roundedness. You must then hone it flat again (600-1200 diamond stone works well for this purpose, 1200 if only a very small amount of honing is required).
Have the hone situated so it can’t slide (most diamond stones come with rubber feet for this purpose.) Lay the knife flat on the hone, put one or two fingers on the blade to gently press it down – to keep the entire blade flat on the hone. With a sawing motion pull and push the knife back and forth, slowly working your way down the hone, away from the edge. (Diamond stones can be used dry – or with a lubricant, soapy water works well if you feel you need a lubricant.)
The shiny surface of the knife should be very quickly dulled, enabling you to be able to see that right near the edge it is still shiny – this is the rounded part of the knife you are honing going to get down to. All carving knives have some flexibility out near the tip – keep this in mind as you hone – keep pressing evenly all the way to the tip by having a finger there if need be. By examining where the knife surface is dulled – or not – you can see if you are maintaining even pressure. Keep honing until there is no shiny line at all near the edge – then flip over and repeat on the other side. If you have a 1200 grit ( extra fine) diamond hone, repeat the same process with it to remove scratches from the coarser hone, but you can end honing with a 600 grit (fine) hone.
To add a microbevel:
Use a wood-backed leather strop with stropping compound. (note: most kinds of stropping compound work ok, but not jewelers rouge – it is for soft metals. )
To create the microbevel, lay it flat on the strop, then raise the knife the thickness of the back of the blade. Give a half dozen firm strokes the length of the strop to each side of the blade, keeping it at this angle.
Under a strong light source, turn the blade until you can see the new microbevel. It should be about 100th of an inch, which is equivalent to the thickness of about 2-3 sheets of regular paper. Important: get magnification, I use 3 to 4 power reading glasses I get at the dollar store. When you can easily see a micro bevel it will make sense, then you can start to learn about them.
The edge is now toughened microscopically, but still allows for very efficient woodcarving. If you carve with it it and it still breaks down it means that you need a heavier microbevel for your particular wood and style of carving techniques.
Maintaining the edge
From now on, the best way to maintain the edge is to strop with the blade flat on the strop. This should maintain the micro-bevel as well (this is because of the natural cushion on the leather).
Eventually, after many many hours of carving, you may find that the bevel is getting too rounded again, you may then go back to the hone, following the above instructions.
Perspective:
Harley carves hundreds of hours a year, yet some knives he has never honed, at most he hones once a year. It could be that Harley doesn’t even know what a micro-bevel is – he is too busy carving! My point being – don’t get obsessive about microbevels or sharpening, just enjoy carving!