For making the mortise:
Purchase the narrowest and coarsest jig-saw (saber-saw) blade your hardware store sells, (here’s a link to an example: http://www.homedepot.com/p/qv/202256384 )
Take a handle-sized piece of wood, nothing fancy for now, a bit bigger than a finished handle is good for starters..
Find a drill bit with a diameter that is the same or just thicker than the jig-saw blade
Drill 2 or 3 holes in the end of the handle next to each other and spaced the width of the saw blade’s tang
Put the handle blank in a vise – or clamp to something solid.
Grip the tang end of the jig-saw blade in ‘vice grip’ type pliers.
Insert saw-blade into the series of holes and clean it out with a sawing action (If the saw-blade is too wide to fit into the rough drilled mortise, you may have to grind some of its back away – but don’t let it overheat of course)
Shape the mortise until it is the size / shape that the saw-blade’s tang can fit all the way in.
When you can insert the tang fully you may now see if the mortise is exactly aligned with the center-line of the handle. If it is then you are free now to finish shaping the handle. If not you have two choices
- Carve out the mortise with the blade until the blade can line up with center-line.
- Draw the angle on the handle that the blade indicates (this is the new center-line of the handle), then shape the handle accordingly – this is one reason to start with slightly oversized handle material.
Shape the handle so it is comfortable to fit your hand, it need not necessarily be sanded.
Epoxy:I prefer the slow set 2-part epoxy, not only because it is stronger, but the slow cure time means it has time to settle down into the mortise and allow air bubbles to surface.
Find a piece of wire (I prefer music wire as it is stiff) and roll a bit of of epoxy onto about an inch of the wire, (but not so much that the epoxy is wider than the mortise slot). It looks like a ‘hotdog on a stick’ or a cattail blossom. It normally takes 3 to 4 times of rolling epoxy onto the wire, inserting into the mortise, and waiting for it to settle before adding the next addition – otherwise it is easy to end up with air bubbles instead of pure glue. I do 18 knives at a time because by the time I get back to the first the epoxy has settled and is ready for the next amount. So figure waiting 5 minute or so between each epoxy insertion.
When finally inserting the knife’s tang into the epoxy filled mortise – go slowly, if there are air pockets they will raise up and pop quicker than the glue will squeeze out, if no air bubbles are present you should get a slow gentle squeeze out of any excess glue. As in good wood joinery – just a little squeeze out is the idea.
A fellow crafts-person wrote to say she uses 91% alcohol (available in bog box stores) to clean up. Great! after 50 years of thinking nasty acetone is the only solvent I am happily switching over.
Unless your mortise is a perfect tight fit to the tang – gravity will pull the blade slightly to one side. Figure checking every 15 minutes for at least an hour if you use a ’30 minute’ type epoxy – how long you have to check on the blade is dependent on temperature and type of epoxy of course.
If you started with an oversize handle blank, then, before shaping, sight down the blade and handle and draw the extension of the blade onto both axis of the handle and use this for a center-line in handle shaping.
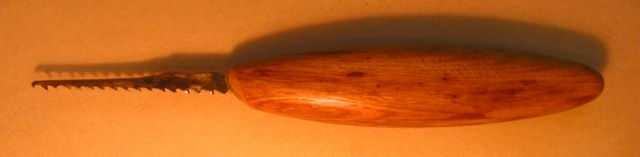
Once glue is hardened and you clean up around the epoxy, then…voilà’! You have just made a knife-makers tool!
Now that you have the idea you can go on to making fine handles for fine blades.
A helpful jig is to cut 2 pieces of wood as ‘soft jaws’ so they sit in your vise, some use 2 sided tape to hold them in place. With this you can grip the blade (after it is epoxied into the handle) for any final fine shaping / sanding / finishing work on the handle.
How to shape the handle? So many ways! This partly depends on the wood you choose; very dense figured wood may be best worked with a band-saw then abrasives on a power tool either as padded discs or belts.
Straight grain medium to soft woods of course can be carved by hand with knives.
Wrapping the blade in many layers of tape of course protects you and the blade.
Hooks or Open Sweeps are “single bevel” blades, so, unlike a sloyd, they cannot be installed symmetrically – it takes more thought, and gives you more subtle possibilities. Difficult to put to words, but sensible in practice.
Put the blade in the mortise (without glue), now, by sighting down the bevel and bottom of the handle – focus on aligning the sweeping curve of the convex bevel – and the curve of the bottom of your handle.
I put a great deal of care into just how these two align. Picture the full sweep of the cut you will make, in particular how it starts and ends. If the edge is rotated (in relation to the handle) too much up toward you it will require you to twist your hand uncomfortably too far back to start the cut. Conversely, if it is too far back it will make it difficult to finish the cut in one sweeping motion.
Do be encouraged by the freedom this gives you to truly custom fit the blade and handle to really suit your carving style.
If you’re new to carving, and a bit flummoxed by this fine point, than a basic guide would be to align the center-line of the long axis of the oval cross section of the handle – with the bisector of the two facets of the blade.
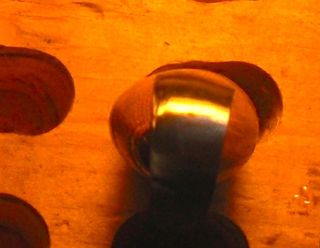
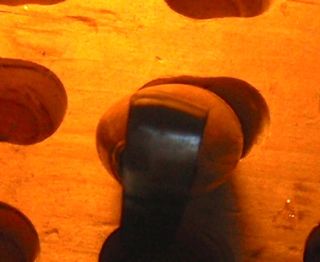
In the pics below of a Left Hand hook knife the first is about right, the second is twisted too far clockwise – it would require the wrist to twist too far back to comfortably start a cut.
Back angle: I personally prefer a little bit of back angle in tools I carve with, it gives a bit of slicing action automatically, but if you do it be careful just how much – it changes the sweep, the rotation, of a tool. If you have no opinion then the safest bet is to install the back of the blade parallel with the center-line axis of the handle.
More tips:
On one of my mortise saws I put flats on 2 sides of the handle, this makes it easy to clamp in a vise with the blade sticking out for when I want to hold the new handle and take it to the clean-out saw. You can also try this by simply clamping the tang of a jigsaw blade itself in a vise.
Need to undo the epoxy? Two possibilities I know of are
#1- Destroy the handle to remove the blade, or
#2 – Some 2-part epoxies soften at 300F – I suspend the blade in 300 degree oil for at least 15 minutes (until the heat migrates all the way to the end of the tang) then put the blade in soft-jaws and by pulling and twisting work off the handle. 300F is quite safe for any carbon steels’ temper.
Finishing: I am often asked what finish we use, it is a ‘rubbing varnish’. The ‘secret’ to it is to have the handle well sanded, at least 600 grit. To apply the fast drying varnish we use throw away medical gloves, just rub it all over and keep rubbing out until it sets. But don’t use more than can soak in and leave only a very thin film. A naked finger works good for the final smoothing. 3 coats is average.
Here it is : General Finishes “Gel Topcoat, Satin”. We buy it by the gallon, but I know it is sold by the quart, pint, or even 1/2 pint, I recommend it for all kinds of fine woodworking. Amazon and lots of woodworking supplies sell it.